Alerts and Notifications
LabKey offers the possibility to receive notifications via email, Telegram, or trigger external calls whenever a user accesses or attempts to access a gate.
Below, we explain how to set up alerts:
- Standard
- System
- Advanced
- Input
Log in to the Manage panel and go to the sidebar menu “Alerts”. You will find four types of alerts.
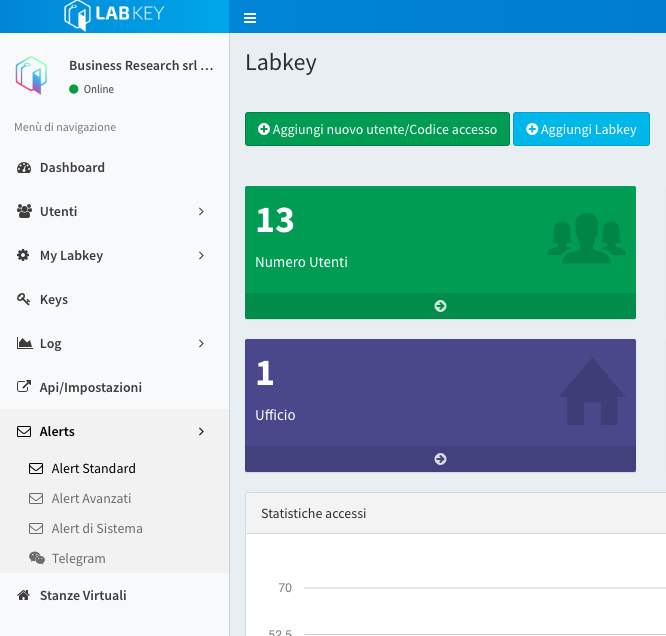
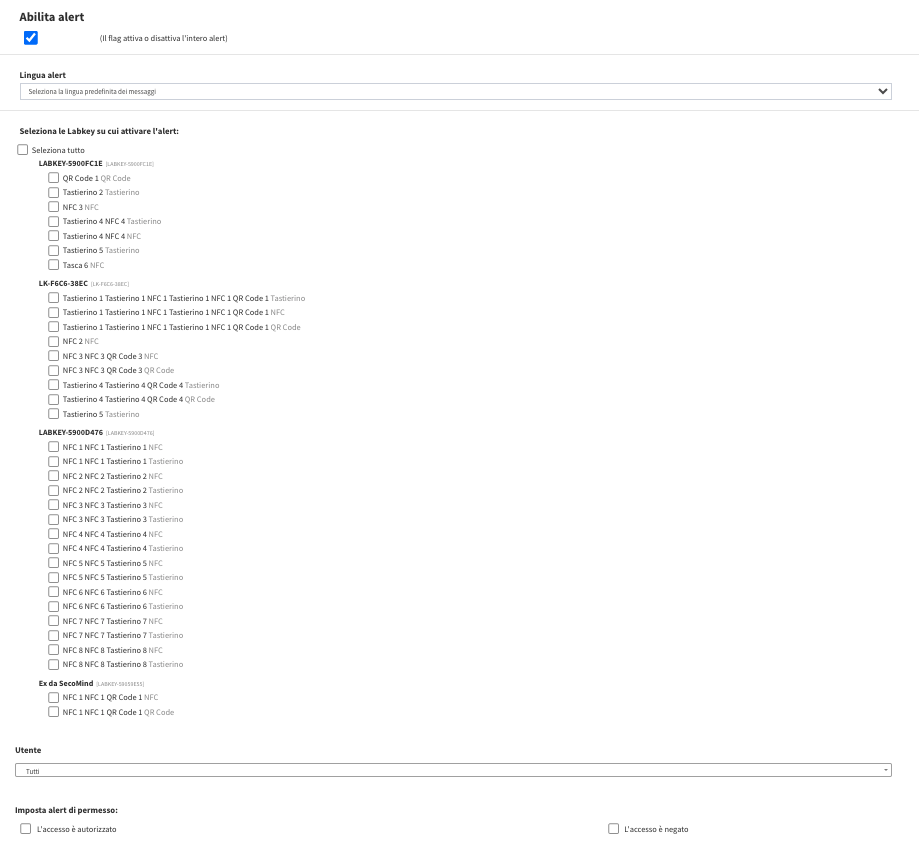
1. Standard Alerts:
Custom notifications for user access (allowed or denied).
- Go to “Alerts” - “Standard Alerts”.
- At the top right, under the title “Alerts and Notifications”, click “Add New”.
- Enable the alert with the first checkbox and select the user or all users.
- Choose when to receive the alert (on allowed access, on denied access, or both).
- Set the notification method by checking the desired option (email notification, external call, SMS, Telegram).
- Select the LabKey device on which to activate the alerts.
- Save your changes.
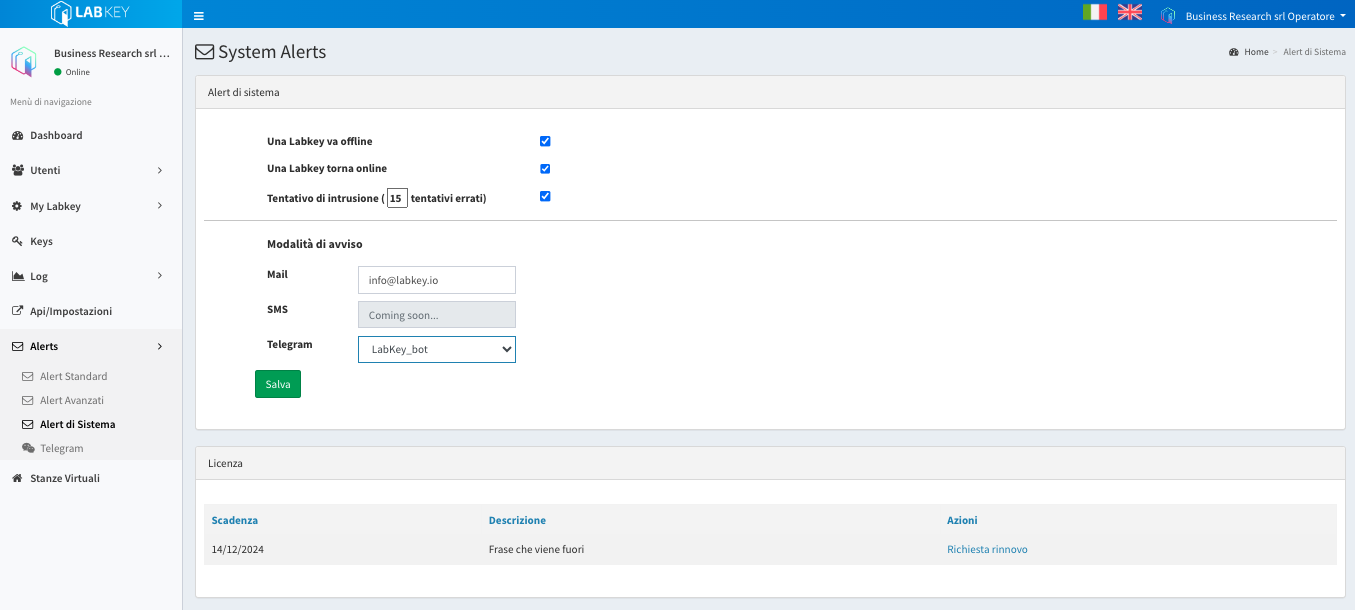
2. System Alerts:
Notifications for connection issues or intrusion attempts.
- Select “System Alerts” and check the desired notifications, entering an email or selecting a Telegram bot.
3. Advanced Alerts:
Attention: to use the following features, you need to activate the base Virtual Rooms plugin.
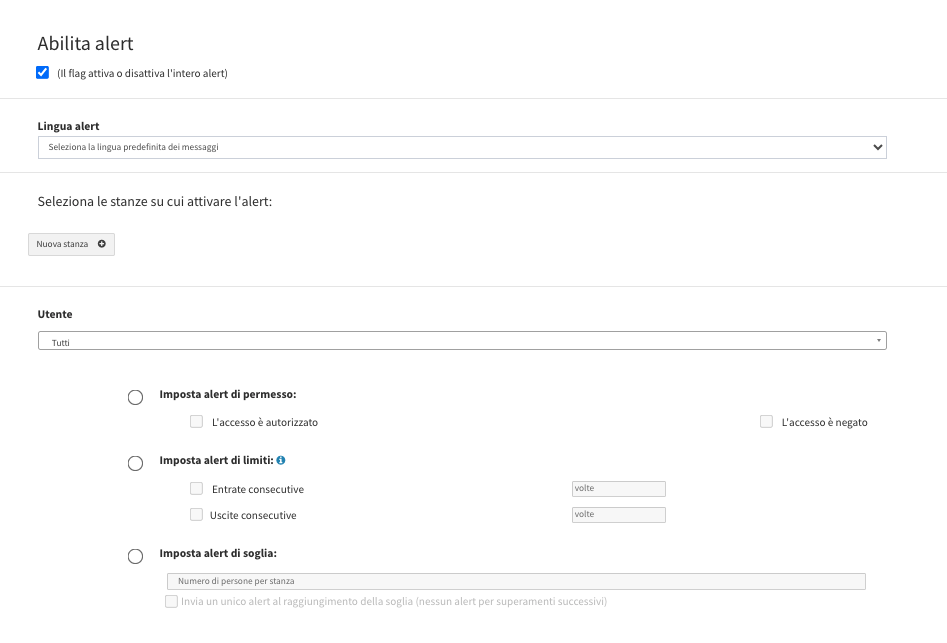
Advanced alerts allow for greater monitoring of access in a specific area of the facility, thanks precisely to the use of the Virtual Rooms feature.
After creating the Virtual Room, you can enable Advanced Alerts by following these steps:
- Go to the “Advanced Alerts” section (after activation by our team).
- At the top left, click the green “Add New” button.
- Select the room for which you want to activate the alerts.
- Select one or more users (that you want to monitor).
- Select the action you want to monitor.
- Select the notification method / how the alert should arrive (email, external API call, Telegram, etc…).
- Click “Save” at the end.
4. Input Alert
The Input Alert allows you to configure an automatic notification when a specific pin on the GPIO connector of the LabKey control unit takes on a specific state.
The alert can be used, for example, to monitor the opening of a door, a contact, or another device connected to an input, while simultaneously checking the accesses recorded in the logs to avoid sending unnecessary notifications.
Creating a new Input Alert
To create a new alert, go to the Input Alert section and select New Input Alert.
The configuration is divided into the following sections:
- Enable alert
- Set the values to check to trigger the alert
- Set any notification exclusion rules
- Select the alert language
- Choose the alert scheduling
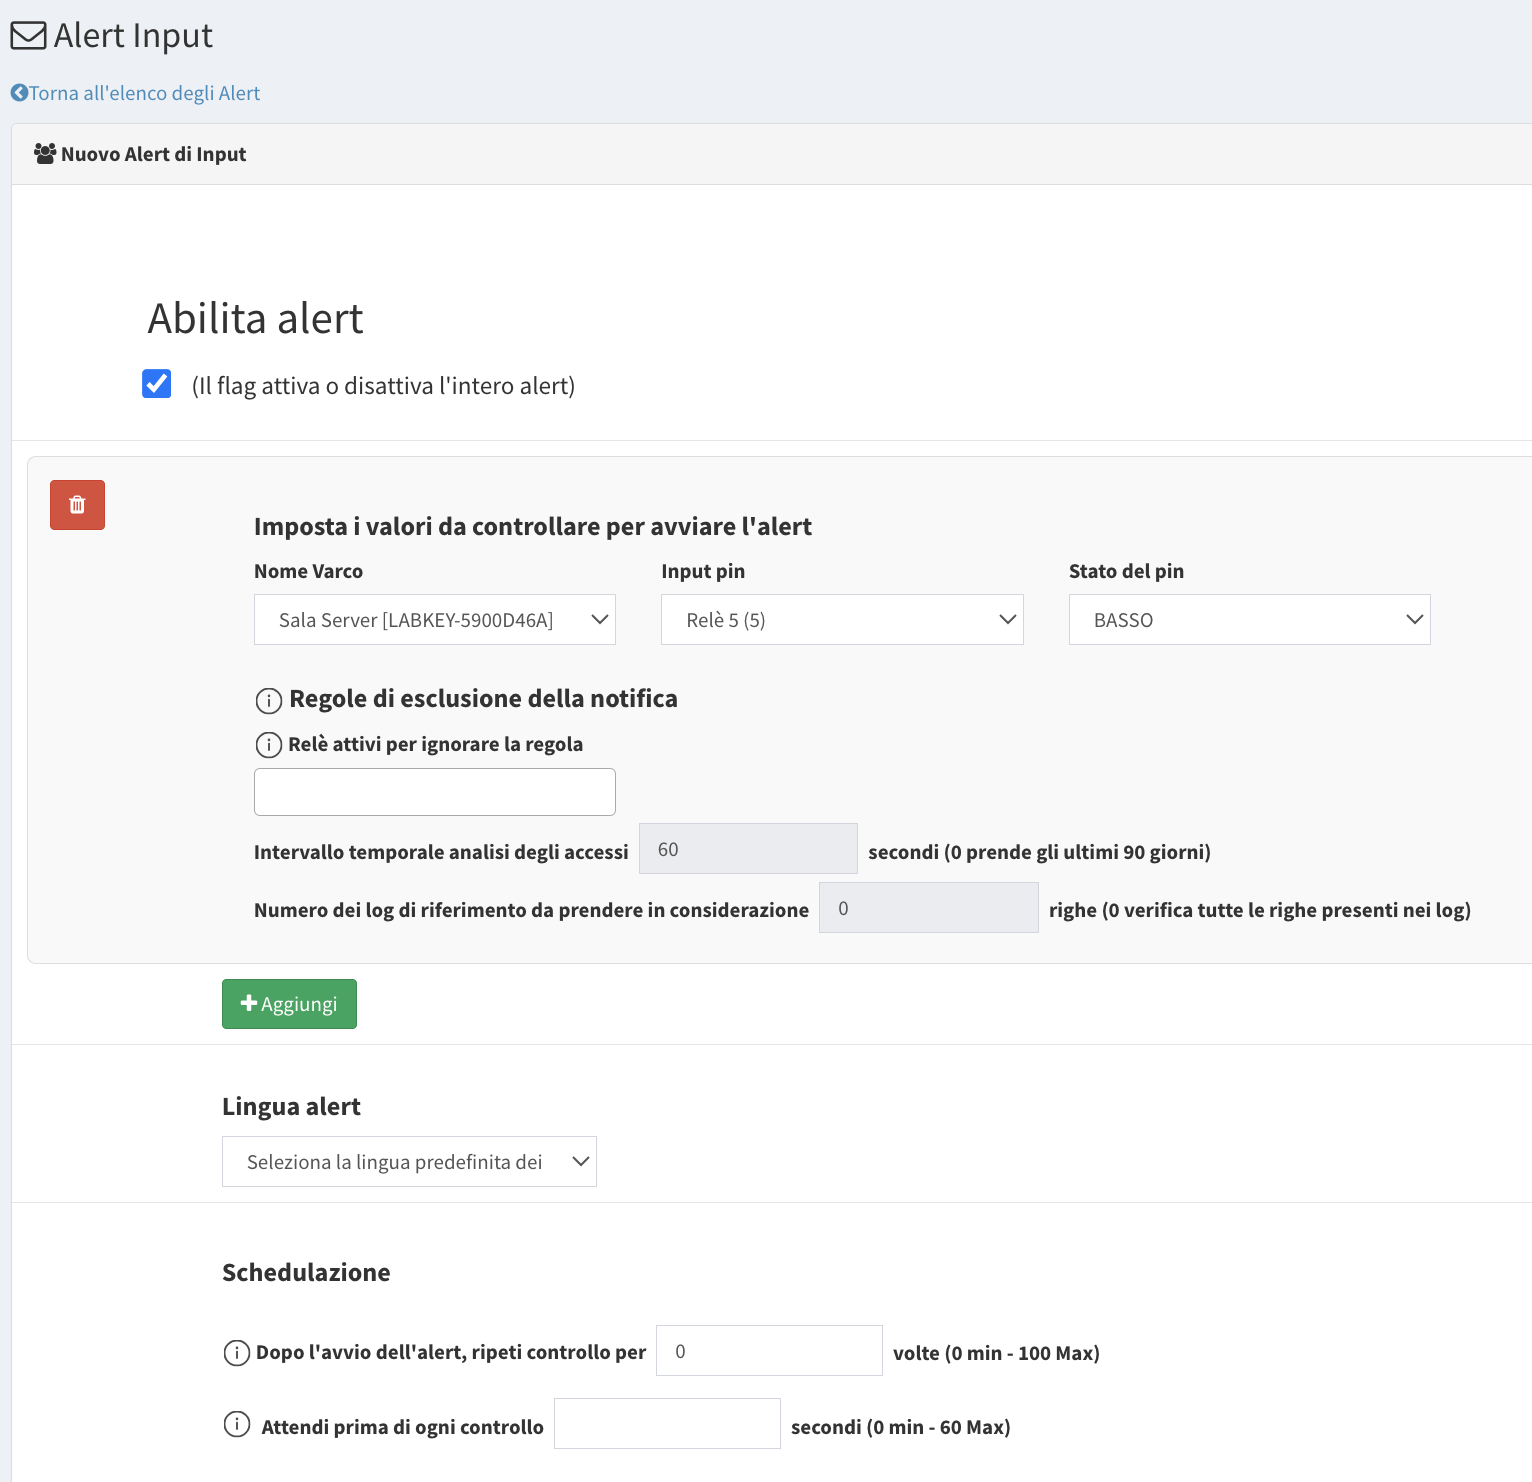
Set the values to check to trigger the alert
This section defines the values that the system must monitor to determine when to trigger the alert:
- Gate Name: select the control unit on which to perform the check.
- Input pin: select the pin number of the control unit connector on which the check must be performed.
- Pin state: select the input state that must trigger the alert.
Set the notification exclusion rules
The Notification Exclusion Rules section allows you to avoid sending notifications when the detected event is associated with an access considered correct.
This feature is particularly useful for reducing false positives.
- Active relays to ignore the rule: indicates the relay(s) that, if present in the access record, allow the alert condition to be ignored.
- Access analysis time interval: defines the time interval, expressed in seconds, that the system must analyze in the logs. If the value is set to 0, the last 90 days are taken into consideration.
- Number of reference logs to take into consideration: allows you to limit the number of log rows used during the check. If set to 0, all rows present in the logs are checked.
Alert language
In the “Alert language” field you can select the default language used for the alert messages.
Scheduling
The “Scheduling” section allows you to configure the checks that follow the alert being triggered.
Two settings are available:
Check repetition: allows you to indicate how many times the system must repeat the check after the alert is triggered. The value 0 indicates that no further repetitions are requested.
Wait before each check: allows you to specify, in seconds, how much time must pass before performing each subsequent check. The allowed value is between 0 and 60 seconds.
Configuration example
Below is an example configuration of an Input Alert to check the opening of a door.
| Field | Example value |
|---|---|
| Enable alert | Active |
| Gate Name | Server Room |
| Input pin | Relay 5 (5) |
| Pin state | LOW |
| Active relays to ignore the rule | Relay 1 |
| Access analysis time interval | 30 seconds |
| Number of reference logs | 1 |
| Alert language | Desired language |
| Repeat check | 0 |
| Wait before each check | 0 seconds |
With this configuration, the system monitors the selected input of the gate and, when the configured state is detected, checks the access logs according to the set parameters.
If an allowed access associated with the relay configured as an exclusion is found in the logs, the notification is ignored. In the absence of a valid access, the alert can instead generate the corresponding notification.
Notification Mode
The Notification Mode section is present in the alert configuration and allows you to choose how to receive notifications. You can enable one or more methods at the same time.
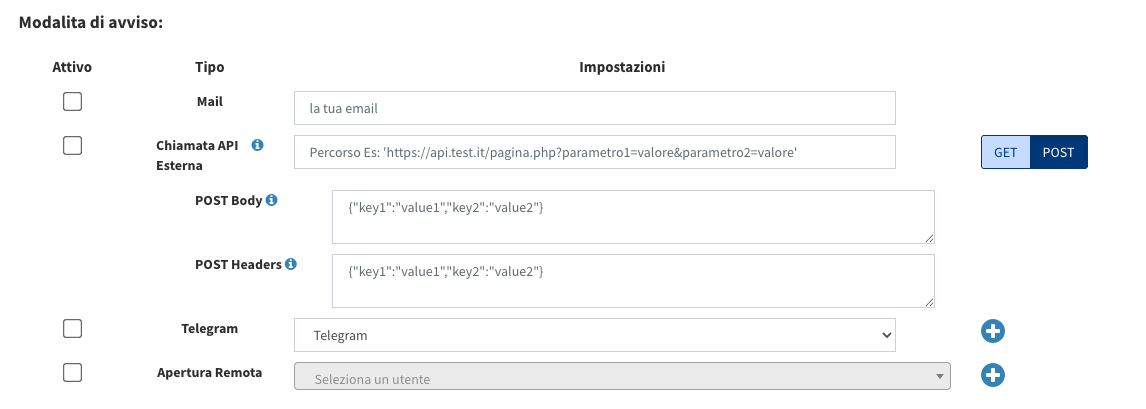
Sends a notification via email to the address entered in the dedicated field.
External API Call
Allows you to send an HTTP request to an external URL on every event. You choose the GET or POST method using the dedicated buttons.
In the URL you can use the following placeholders (written in CAPSLOCK), which are automatically replaced with the real values at the time of the call:
| Placeholder | Value substituted |
|---|---|
USER_ID | User ID |
FULL_NAME | User’s full name |
ID_LOG | Access log ID |
KEY_CODE | Code of the key used |
RESULT_BOOLEAN | Access allowed (true/false) |
TIMESTAMP | Date and time of the log |
IS_LOG_OFFLINE | Offline access (true/false) |
UNIQUE_NAME | Unique name of the device |
LABKEY_ID | LabKey device ID |
TAGS | Tags associated with the access |
EVENT_TYPE | Type of event that triggered the alert |
Possible values of EVENT_TYPE
Access alerts (standard type in the DB):
standard_accesso_autorizzato— alert on a single LabKey, triggers only for authorized accesses.standard_accesso_negato— alert on a single LabKey, triggers only for denied accesses.standard_entrambi— alert on a single LabKey, triggers for both authorized and denied accesses.avanzato_accesso_autorizzato— room-level alert, triggers only for authorized accesses.avanzato_accesso_negato— room-level alert, triggers only for denied accesses.avanzato_entrambi— room-level alert, triggers for both authorized and denied accesses.
System and counter alerts:
online— LabKey reachable again after a connection interruption.offline— LabKey no longer reachable from the panel.intr— threshold of consecutive denied access attempts from unknown users reached (intrusion).volte— the user has exceeded the allowed number of consecutive entries or exits.max_persone— maximum number of people inside a room reached.
GET example: https://api.my-server.com/event?user=USER_ID&result=RESULT_BOOLEAN
When the call is made, USER_ID is replaced with the real user ID, RESULT_BOOLEAN with true or false, and so on.
POST Method
If POST is selected, two additional fields will appear:
POST Body (optional) – JSON body of the request. Here too you can use the placeholders listed above. Example:
{"user":"USER_ID","result":"RESULT_BOOLEAN"}POST Headers (optional) – Additional HTTP headers, useful for passing authentication tokens or other parameters. Example:
{"Authorization":"Bearer your_token"}
Telegram
Sends a notification via a previously configured Telegram bot. To configure the bot, go to “Alerts” → “Telegram” and add your bot’s credentials.
Click “Add New”, fill in the required fields with your bot’s information, and follow the available online guides for more details on how to create a Telegram bot to send them to.
With this alert configuration, you will be promptly informed of critical events and will be able to take the necessary measures to ensure the security of your access control system.
Remote Opening
Activates the opening of one or more relays based on the access parameters of a specifically created, authorized, and selected user. To use this feature:
- Create a dedicated user in the Manage panel and follow the standard procedure for Adding a New User
- Authorize it on the LabKey devices on which you want the relay(s) to open.
- Select it from the “Select a user” dropdown menu.
When the alert is triggered, the system will open the relays according to that user’s authorizations.